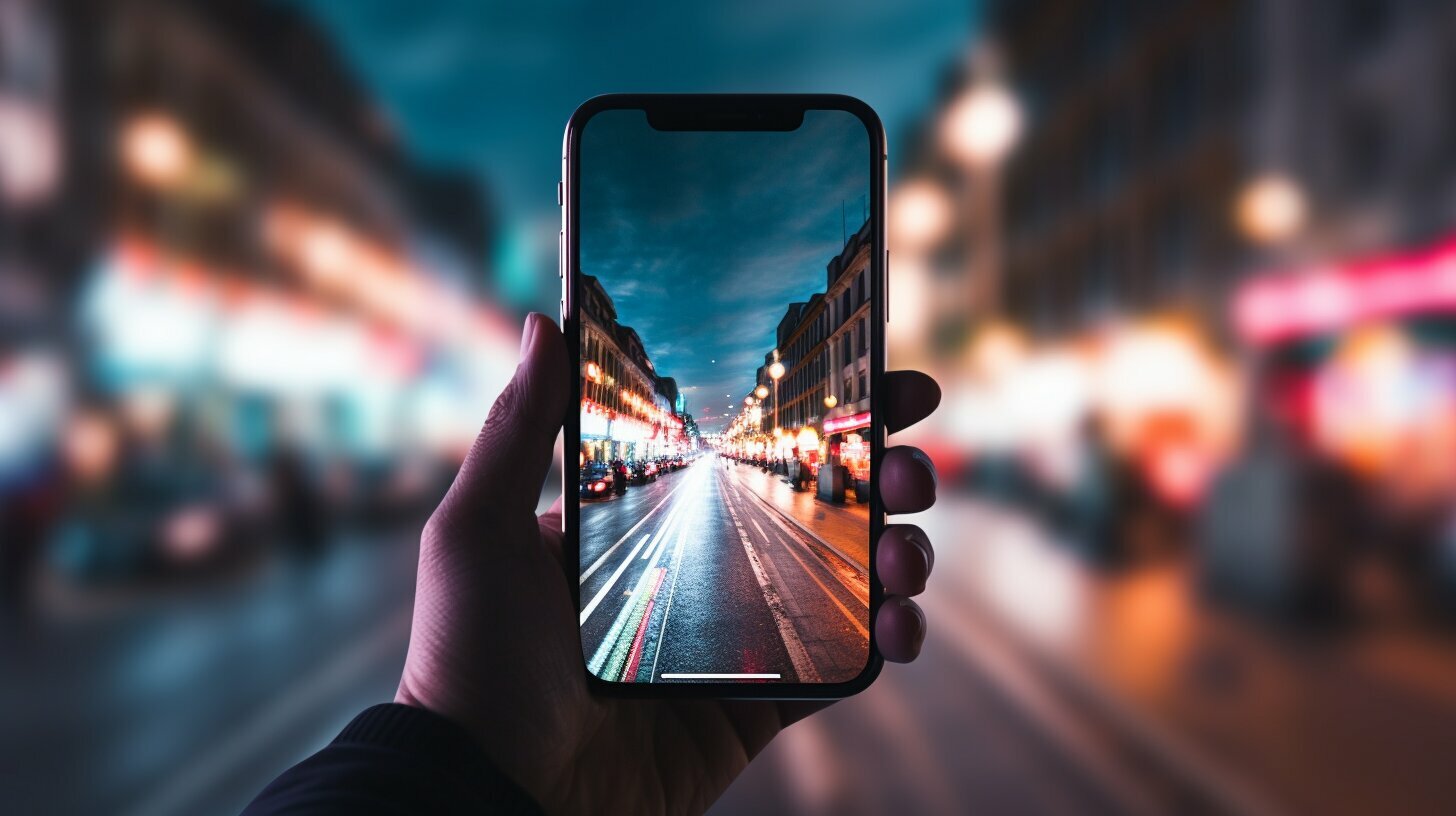
Long exposure photography has long been a technique used by professional photographers to produce stunning landscape shots and light trails. With recent advancements in iOS and third-party apps, you can now achieve long exposure effects on your iPhone. In this comprehensive guide, we’ll cover essential tips and techniques for capturing breathtaking long exposure photos using your iPhone camera. Get ready to unleash your creativity and take your photography skills to the next level!
Key Takeaways:
- Converting Live Photos is one way to create long exposure effects on your iPhone.
- Use a long exposure photography app like Slow Shutter Cam or ProCam 6 for more control and customization.
- Position your iPhone on a tripod or stable surface to avoid camera shake and achieve sharper images.
- Experiment with different camera settings such as shutter speed, focus, and white balance to achieve the desired effect.
- Consider using neutral density filters to block out light and capture long exposure shots during the day.
Converting Live Photos into Long Exposure Shots
One way to achieve long exposure on your iPhone is by converting Live Photos. By following a few simple steps, you can transform your Live Photos into stunning long exposure shots. Here’s how:
Step 1: Turn on Live Photos in the Camera app. This will allow your iPhone to capture a few seconds of footage before and after you take a photo.
Step 2: Set the self-timer for the desired duration. This will give you enough time to stabilize your iPhone on a tripod or a stable surface before the shot is taken.
Step 3: Position your iPhone on a tripod or a stable surface. This is crucial to avoid camera shake and ensure sharp images.
Step 4: Take the shot. Press the shutter button on your iPhone to capture the Live Photo.
Step 5: Open the Photos app and select the Live Photo you want to convert into a long exposure shot.
Step 6: Apply the long exposure effect. Tap on the “Edit” button, then tap on the “Live” icon at the bottom of the screen. Swipe the slider to the left to decrease the exposure time and create the desired long exposure effect.
That’s it! With these simple steps, you can turn your Live Photos into beautiful long exposure shots right on your iPhone.
Best Apps for Long Exposure on iPhone
If you prefer to have more control over your long exposure photography, there are also several apps available that can help you achieve the desired effect. Some of the best apps for long exposure on iPhone include:
- Slow Shutter Cam: This app allows you to adjust shutter speed, ISO, and focus to create stunning long exposure shots.
- ProCam 6: With this app, you can control various settings like shutter speed, ISO, and white balance to capture the perfect long exposure photo.
These apps provide advanced features and customization options, making them ideal for photographers who want to take their long exposure photography to the next level.
| Pros | Cons |
|---|---|
| Easy to use | May require additional purchase for full functionality |
| Provides control over settings | May take some time to learn all features |
| Allows for creative experimentation | Requires additional storage space |
Using Long Exposure Photography Apps
If you want more control over your long exposure shots, using dedicated long exposure photography apps on your iPhone can offer advanced features and techniques. These apps give you the ability to adjust the shutter speed, focus, white balance, and other settings to achieve the desired effect. They are a great alternative for those who prefer a more hands-on approach to capturing long exposure photos.
Popular Long Exposure Photography Apps
There are several popular apps available that can help you master long exposure photography on your iPhone. One of these is Slow Shutter Cam, which allows you to control the shutter speed and capture stunning light trails, motion blur, and other long exposure effects. Another option is ProCam 6, which offers a range of advanced features such as manual control over ISO, shutter speed, and focus. These apps give you the flexibility to experiment with different settings and techniques to achieve the perfect long exposure shot.
Tips and Techniques
When using long exposure photography apps, it’s important to keep a few tips and techniques in mind. First, make sure you have a stable surface or tripod to avoid camera shake. This will help you capture sharp and clear images. Additionally, consider using a remote shutter release or the built-in self-timer feature on your iPhone to further minimize camera shake.
Experimentation is key when it comes to long exposure photography. Try capturing different subjects, such as waterfalls, traffic, or cityscapes, to create unique and captivating long exposure effects. Don’t be afraid to adjust your settings and try different techniques. Remember, practice makes perfect, and with time and experience, you’ll be able to master long exposure photography on your iPhone.
| Advantages of Long Exposure Photography Apps | Popular Apps |
|---|---|
| Ability to control shutter speed, focus, and other settings | Slow Shutter Cam |
| Flexibility to experiment with different techniques | ProCam 6 |
| Easy-to-use interfaces | |
| Opportunity to capture stunning light trails and motion blur |
So, if you’re ready to take your long exposure photography to the next level, consider using long exposure photography apps on your iPhone. With their advanced features and techniques, you’ll have more control over your shots and be able to capture stunning long exposure effects. Remember to pair your app with a stable surface or tripod and don’t be afraid to experiment. Soon, you’ll be creating masterpieces with your iPhone camera!
Essential Tools and Techniques for Long Exposure on iPhone
To achieve the best long exposure results on your iPhone, it’s crucial to use the right tools and techniques. We’ll cover everything you need to know, from using a tripod to adjusting camera settings.
Using a tripod or stable surface is the foundation for capturing sharp long exposure photos. It helps eliminate camera shake, resulting in clear and crisp images. Invest in a sturdy tripod or find a stable surface to place your iPhone on when shooting. This will ensure maximum stability and prevent unwanted blurring in your photos.
In terms of camera settings, you have control over a few key options that can greatly impact your long exposure shots. Start by selecting the appropriate shooting mode on your iPhone camera, such as “Live” or “Slow Shutter.” These modes are specifically designed for capturing long exposure photos and provide enhanced control over shutter speed and other parameters.
Experimenting with different shutter speeds is essential to achieving the desired effect. A longer shutter speed allows more light to enter the camera sensor, resulting in a greater sense of motion and flow in your photos. Try adjusting the shutter speed to create different effects like smooth water or blurred clouds.
| Tool/Technique | Description |
|---|---|
| Neutral Density (ND) Filters | ND filters are essential for long exposure photography during the day. They reduce the amount of light entering the camera, allowing you to use longer shutter speeds without overexposing the image. |
| Wireless Shutter Release | A wireless shutter release remote enables you to trigger the camera without physically touching it. This eliminates any potential camera shake caused by pressing the shutter button and ensures sharp long exposure photos. |
| Camera Apps | Use reputable camera apps like Slow Shutter Cam or ProCam 6 to have more control over your iPhone’s camera settings. These apps allow you to adjust shutter speed, ISO, focus, and other parameters to fine-tune your long exposure shots. |
By utilizing these essential tools and techniques, you’ll be well on your way to capturing stunning long exposure shots with your iPhone. Remember to experiment, practice, and embrace your creativity as you explore the endless possibilities of long exposure photography.
Conclusion
By following the techniques and tips outlined in this article, you can unlock the power of long exposure photography on your iPhone and create truly breathtaking images. Long exposure photography has long been a favorite technique among professional photographers for capturing stunning landscape shots and mesmerizing light trails. In the past, achieving this effect was limited to DSLR cameras, but thanks to recent iOS updates and the availability of third-party apps, iPhone users can now join in on the fun.
There are two main methods for creating long exposure photos on an iPhone. The first method involves converting Live Photos into long exposure shots. Simply turn on Live Photos in your iPhone’s Camera app, set the self-timer for stability, position your phone on a tripod, take the shot, and then open the Photos app to apply the long exposure effect. It’s a simple yet effective way to achieve stunning long exposure photos.
Alternatively, you can take advantage of long exposure photography apps like Slow Shutter Cam or ProCam 6. These apps allow you to control important settings such as shutter speed, focus, and white balance, giving you full creative control over your long exposure shots. The ability to fine-tune these settings will enable you to capture the exact effect you desire, resulting in truly unique and captivating images.
Remember, using a tripod or stable surface is crucial to avoid camera shake and ensure sharp images. Additionally, neutral density filters can be used during the day to block out excessive light and achieve long exposure effects even in bright conditions. With practice and experimentation, you’ll be able to master long exposure photography on your iPhone and unleash your creativity in new and exciting ways.
FAQ
Q: Can I create long exposure effects using my iPhone?
A: Yes, with recent iOS updates and third-party apps, it is now possible to achieve long exposure photography on an iPhone.
Q: What are the methods for creating long exposure photos on an iPhone?
A: There are two ways to create long exposure photos on an iPhone: converting Live Photos to long exposure shots or using a long exposure photography app.
Q: How can I convert Live Photos into long exposure shots?
A: To convert Live Photos, turn on Live Photos in the Camera app, set the self-timer, position your iPhone on a tripod, take the shot, open the Photos app, and apply the long exposure effect.
Q: Are there any recommended long exposure photography apps for iPhones?
A: Yes, popular apps like Slow Shutter Cam and ProCam 6 allow you to control shutter speed, focus, white balance, and other settings to achieve the desired long exposure effect.
Q: What tools and techniques are essential for long exposure on an iPhone?
A: Using a tripod or stable surface is crucial to avoiding camera shake and getting sharp images. Additionally, neutral density filters can be used during the day to block out light and create long exposure effects.
Q: What is the key to mastering long exposure on an iPhone?
A: Mastering long exposure photography on an iPhone requires experimentation, practice, and the use of the right tools and techniques. Don’t be afraid to unleash your creativity and start capturing stunning long exposure photos today.